I’ve been using IRC since about age 11. When Discord got popular a few years ago, I took a hiatus for awhile, but inevitably returned. The quality of life differences are pretty remarkable, and I wanted to preserve some semblence of that. The most common feature I found myself missing was easily uploading images.
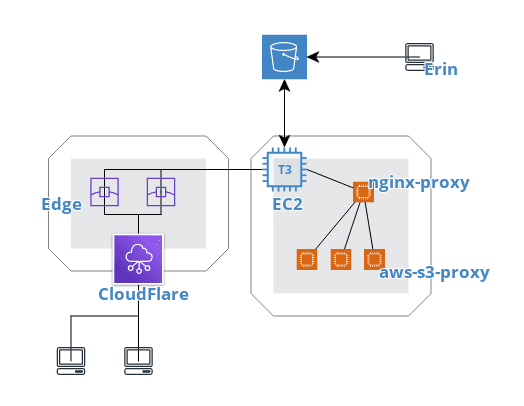
I spent some time hacking away to reproduce this nicety and am pretty pleased with the result. I can now issue a command in CLI or GUI on my home Linux workstation and have a link added to my clipboard to easily paste into my IRC client. There is also a keybind in my window manager to make a selection on my screen and invoke the same workflow. The local script is written in Python, and the backend consists of a CDN backed by a Dockerized AWS S3 proxy on a VM.

User Experience
From my perspective, all I do is activate my keybind or invoke the script through a app association. From there, the image or whatever is uploaded to an S3 bucket and I get a nice desktop notification of start, progress if the file is large enough, and finish. I’m not going to talk about the script because programming is not actually fun for me. 😅
To simplify calling the script, I added a symlink to a system location:
sudo ln -s /path/to/script.py /usr/local/bin/drop
Since I use i3, keybinds are pretty easy to add:
bindsym Mod4+c exec drop bindsym --release Mod4+Print exec
/path/to/screenshot-selection-upload.sh
I was confused for a minute when this didn’t work initially and had to debug
i3 to figure out I needed the --release flag.
Some tools (such as import or xdotool) might be unable to run upon a KeyPress event, because the keyboard/pointer is still grabbed. For these situations, the –release flag can be used, which will execute the command after the keys have been released.
The helper script for selecting screenshotting essentially just calls scrot
and passes the image on:
#!/bin/bash

capturepath=${HOME}/Pictures
cd $capturepath
capturefile=$(scrot -s -e 'echo $f')
if [ $? -eq 0 ] ; then
	drop ${capturepath}/${capturefile}
else
	exit 1
fi
Then in the desktop file, we have our supporting mimetypes:
[Desktop Entry]
Name=Upload to S3
GenericName=Upload to S3
Comment=Get an HTTP link to a file
Categories=Network;
Exec=drop %u
Terminal=false
Type=Application
MimeType=image/png;image/gif;image/webp;image/jpeg;image/jpg;application/pdf;text/plain;
For this to to present in a GUI Open With menu, we just need to regenerate the relevant cache:
sudo update-desktop-database
Backend
I use AWS for all kinds of things at work and outside of it, but it wasn’t a requirement for this project at its core. If you’re interested in repoducing something like this, any storage/hosting backplane that you can script upload to will do fine. There’s nothing special about my EC2 or S3 configuration to speak of. I did choose doing this over an S3 website, for various reasons, though.
When someone clicks my link, it hits Cloudflare directly. They serve as nameserver and geo-distributed edge cache. Pretty much, no matter where you live, you’ll get served my content from a server fairly close to you. This improves latency and speeds. Critically, it is also free for me, whereas had I gone with S3 + AWS CloudFront, it’d have been more expensive. This way, I am billed for CloudFlare pulling objects to their edge locations only, instead of that, with CloudFront, plus serving data from the edge to the internet.
Provisioning an EC2 instance, S3 bucket and CloudFlare domain is pretty trivial, and I won’t get into that here.
Since I run multiple internet-facing applications from my instance, I chose to use an jwilder/nginx-proxy Docker container to route requests that come in to it for a certain virtual host to the appropriate container. It’s a neat concept and makes it easy to quickly try out apps as I fancy. Once that container is running in its own external Docker network, all you need to do is launch other containers in that same network and pass an environment variable defining the virtual host it will be serving traffic on.
The S3 proxy (pottava/aws-s3-proxy) is also an off-the-shelf FOSS solution that came pre-Dockerized. All I had to do is grant the instance’s IAM role the relevant permissions to get objects from the bucket it backs, lightly configure it and I was on my way!
version: '3.7'

services:
  nginx:
    image: jwilder/nginx-proxy:latest
    container_name: nginx-proxy
    ports:
      - "443:443"
    volumes:
      - /home/ec2-user/nginx-proxy/certs:/etc/nginx/certs
      - /var/run/docker.sock:/tmp/docker.sock:ro
    networks:
      default:
        ipv4_address: 172.18.0.4
  s3-proxy:
    image: pottava/s3-proxy
    container_name: s3-proxy
    expose:
      - 8080
    environment:
      - VIRTUAL_HOST=cdn.catgirl.technology
      - APP_PORT=8080
      - AWS_REGION=us-west-2
      - AWS_S3_BUCKET=bucket-name-here
    networks:
      default:
        ipv4_address: 172.18.0.5

networks:
  default:
    external:
      name: nginx-proxy
I had worked with nginx in this sort of a reverse proxy capacity before, but it
had been differently automated and far less abstractified away. This was my
first time messing about with docker-compose and any of these container
images. It was a nice learning experience, and comparatively easier to get a
grasp on. I’ve applied it to a few other projects at this point, and am quite
pleased with the simplicity of its design. 😊
« Greynet medicines ✧ Anti-androgens: spironolactone and bicalutamide »